Difference: TrackWork (2 vs. 3)
Revision 32011-05-12 - PeterSchmid
| Line: 1 to 1 | ||||||||
|---|---|---|---|---|---|---|---|---|
HOn30 Trackwork Mini HowTo | ||||||||
| Line: 109 to 109 | ||||||||
| overhang (5-2)/2 = 1 1/2" Campbell Ties: | ||||||||
| Changed: | ||||||||
| < < | 1.3 x 2.4 x 28 mm HO standard gauge 1.3 x 2.4 x 21 mm H0n3 They are relative thin, to prevent splitting (nails), less gravel is needed to cover the ground. | |||||||
| > > |
| |||||||
| Changed: | ||||||||
| < < | Micro Engineering full profile Ties: 1.7 x 2.3 x 23.5 mm HOn3 (37-103) | |||||||
| > > | Micro Engineering full profile Ties (37-103):
| |||||||
| PCB ties are about 1.6 mm / 1/16" thick) | ||||||||
| Changed: | ||||||||
| < < | Fast Track HO narrow gauge PCB crossties: 1.6 x 2.0 x 21 mm (in HOn30 templates) | |||||||
| > > | Fast Track HO narrow gauge PCB crossties (in HOn30 templates):
| |||||||
| PCB crossties are 13-1/2 scale feet long by 7 scale inches wide (.080"), and are available in 1/16" and 1/32" thickness. I cut my ties from a 1.6 x 100 x 160 mm printed circuit board PCB (in Switzerland it is available from Distrelec, Partnumber 450335, for 2.50 CHF that's about $2). I prefer FR-2 PCBs, because the FR-4 (glass/epoxy) makes your sawing blades dull. I saw about 2.3 mm stripes from the PCB with a fretsaw and cut the ties to length (20 mm) with a wire cutting pliers. I choose 8 mm center-to-center distance for my pike. | ||||||||
| Line: 128 to 128 | ||||||||
| FR-2 is composite material made of paper impregnated with a plasticized phenol formaldehyde resin (Synthetic Resin Bonded Paper (SRBP), Bakelite, Lamitex, Paxoline, Pertinax) FR-4 is a composite of a resin epoxy reinforced with a woven fiberglass mat (epoxy resin bonded glass fabric (ERBGF), Veroboard) printed circuit board (PCB) | ||||||||
| Changed: | ||||||||
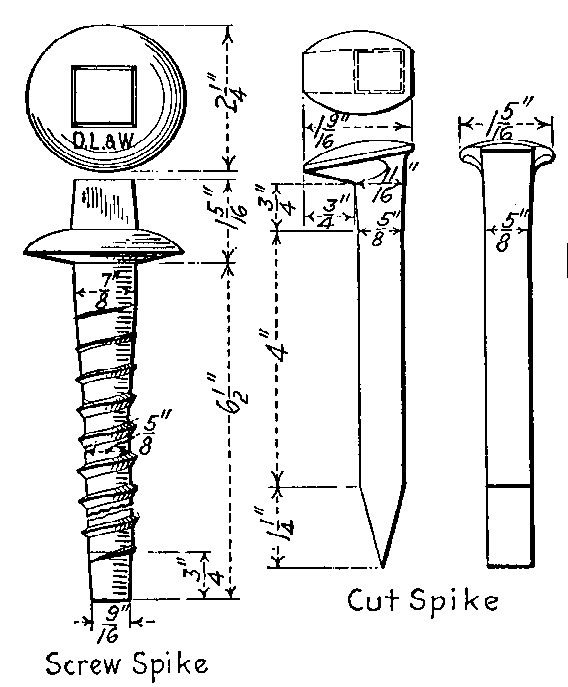
| < < | Spikes | |||||||
| > > |
Spikes | |||||||
| Cut spikes are about 6" long, the spike head is about 1 9/16" x 1 5/16" in HO is this 1.75 x 0.46 x 0.38 mm. The small spikes from Micro Engineering are 8.0 x 1.7 x 1.0 mm, they are far too large. You can build your own spike from 0.4 mm wire, you have to drill holes into the ties too. That's why I omit the spikes. | ||||||||
| Added: | ||||||||
| > > | 
Tie PlatesTie plates were not always used for narrow gauge tracks. But normally they were found at least on turnouts and in curves. They are 5" to 10" wide and about 1/2" (HO 0.15 mm) thick. Tie plates for HO are too small and too difficult to build for me. I omit tie plates on my tracks.TipsTools needed
Soldering tips
How To Scratch Build a Narrow Gauge Standard Gauge CrossingAs far as I know there is no commercial narrow gauge standard gauge crossing available. It takes me about 4 h to build a "diamond" from scratch. You need only only some code 70 rails and PCB cross ties. Step by step instructions to build a crossing from scratch: Print out a template, e.g. from Fast Tracks http://www.handlaidtrack.com/How To Convert an Atlas N Code 55 Turnout to HOn30Commercial available HOn30/H0e/009 turnouts from Peco, Tillig, Technomodell, and Roco have too heavy rails (Code 80/83) and too wide angles (15 °, less than #4). You can build the turnouts from scratch, but for me it is difficult and to time-consuming to build the heel of the switch (especially the hinge) and the frog. The N code 55 turnouts from Atlas are available with frog numbers #5 and #7 (for details see http://www.atlasrr.com/Trackmisc/ncode55.htm | |||||||
-- PeterSchmid - 2011-05-09
| ||||||||
| Line: 171 to 236 | ||||||||
| ||||||||
| Added: | ||||||||
| > > |
| |||||||
View topic | History: r14 < r13 < r12 < r11 | More topic actions...
Ideas, requests, problems regarding TWiki? Send feedback