Difference: ClimaxProject (1 vs. 3)
Revision 32014-11-15 - PeterSchmid
| Line: 1 to 1 | ||||||||
|---|---|---|---|---|---|---|---|---|
H0n30 Climax | ||||||||
| Line: 6 to 6 | ||||||||
     | ||||||||
| Changed: | ||||||||
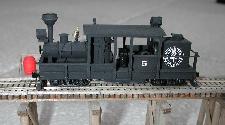
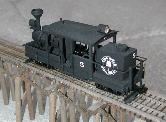
| < < | Scratch built Climax (H0n30). This photos are taken with a Nikon CoolPix 900 camera. More photos will follow. | |||||||
| > > | Scratch built Climax (H0n30). The photos are taken with a Nikon CoolPix 900 camera. More photos will follow. | |||||||
Prototype Information | ||||||||
Revision 22011-05-09 - PeterSchmid
| Line: 1 to 1 | ||||||||
|---|---|---|---|---|---|---|---|---|
H0n30 Climax | ||||||||
| Changed: | ||||||||
| < < | 


 | |||||||
| > > |      | |||||||
| Scratch built Climax (H0n30). This photos are taken with a Nikon CoolPix 900 camera. More photos will follow. | ||||||||
| Line: 12 to 8 | ||||||||
| Scratch built Climax (H0n30). This photos are taken with a Nikon CoolPix 900 camera. More photos will follow. | ||||||||
| Deleted: | ||||||||
| < < | ||||||||
Prototype Information | ||||||||
| Changed: | ||||||||
| < < | A good source for information about Climax Locomotives prototypes | |||||||
| > > | A good source for information about Climax Locomotives prototypes | |||||||
| Added: | ||||||||
| > > | The definitive guide to the Climax locomotives: Dennis Blake Thompson, Richard Dunn, Steve Hauff, et al, The Climax Locomotive, Oso Publishing 2002, ISBN 1-9647521-6-6, http://www.osorail.com | |||||||
T-Boiler | ||||||||
| Changed: | ||||||||
| < < |  | |||||||
| > > |  | |||||||
| T-boiler for my scratch built climax. The boiler consists of two brass tubes with 9.5 mm and 13 mm diameter. The project was inspired by the Roundhouse Battle Mountain Climax. I bought the kit several years ago, but in the end I did not use any part from the kit except the idea. | ||||||||
| Line: 25 to 20 | ||||||||
| T-boiler for my scratch built climax. The boiler consists of two brass tubes with 9.5 mm and 13 mm diameter. The project was inspired by the Roundhouse Battle Mountain Climax. I bought the kit several years ago, but in the end I did not use any part from the kit except the idea. | ||||||||
| Deleted: | ||||||||
| < < | ||||||||
MotorizingNWSL Kingpin | ||||||||
| Changed: | ||||||||
| < < |  | |||||||
| > > |  | |||||||
|
The NWSL | ||||||||
| Changed: | ||||||||
| < < | I was intrigued with your innovative solution to the kingpin assembly on the NWSL truck. I've been having difficulty with these myself on a Shay I'm building. You'll be interested to know that, having no lathe, I tried chucking the kingpin in my Dremel, using sandpaper at low-speed to true up the kingpin end, and then using a 1.2mm drill in a pin-vise to drill the hole for the 1.4mm screw whilst still running the Dremel at low-speed. This worked a treat -- thanks for the idea that pointed me in that direction! | |||||||
| > > | I was intrigued with your innovative solution to the kingpin assembly on the NWSL truck. I've been having difficulty with these myself on a Shay I'm building. You'll be interested to know that, having no lathe, I tried chucking the kingpin in my Dremel, using sandpaper at low-speed to true up the kingpin end, and then using a 1.2mm drill in a pin-vise to drill the hole for the 1.4mm screw whilst still running the Dremel at low-speed. This worked a treat -- thanks for the idea that pointed me in that direction! | |||||||
Trucks, Sideframes | ||||||||
| Changed: | ||||||||
| < < | 

 | |||||||
| > > |    | |||||||
| I used the original sideframes (non-geared on both sides) from NWSL (#2086.005). | ||||||||
| Line: 49 to 37 | ||||||||
| I used the original sideframes (non-geared on both sides) from NWSL (#2086.005). | ||||||||
| Deleted: | ||||||||
| < < | ||||||||
Finished Model | ||||||||
| Changed: | ||||||||
| < < | 

 | |||||||
| > > |    | |||||||
| -- PeterSchmid - 2011-05-09 | ||||||||
Revision 12011-05-09 - PeterSchmid
| Line: 1 to 1 | |||||||||||||||||||||||||||||||||||||||||||||||||||||||||||||
|---|---|---|---|---|---|---|---|---|---|---|---|---|---|---|---|---|---|---|---|---|---|---|---|---|---|---|---|---|---|---|---|---|---|---|---|---|---|---|---|---|---|---|---|---|---|---|---|---|---|---|---|---|---|---|---|---|---|---|---|---|---|
| Added: | |||||||||||||||||||||||||||||||||||||||||||||||||||||||||||||
| > > |
H0n30 Climax


 Scratch built Climax (H0n30). This photos are taken with a Nikon CoolPix 900 camera. More photos will follow.
Prototype InformationA good source for information about Climax Locomotives prototypes
T-Boiler T-boiler for my scratch built climax. The boiler consists of two brass tubes with 9.5 mm and 13 mm diameter. The project was inspired by the Roundhouse Battle Mountain Climax. I bought the kit several years ago, but in the end I did not use any part from the kit except the idea.
MotorizingNWSL Kingpin The NWSL
I was intrigued with your innovative solution to the kingpin assembly on the NWSL truck. I've been having difficulty with these myself on a Shay I'm building. You'll be interested to know that, having no lathe, I tried chucking the kingpin in my Dremel, using sandpaper at low-speed to true up the kingpin end, and then using a 1.2mm drill in a pin-vise to drill the hole for the 1.4mm screw whilst still running the Dremel at low-speed. This worked a treat -- thanks for the idea that pointed me in that direction! Trucks, Sideframes

 I used the original sideframes (non-geared on both sides) from NWSL (#2086.005).
Finished Model

 -- PeterSchmid - 2011-05-09
| ||||||||||||||||||||||||||||||||||||||||||||||||||||||||||||
View topic | History: r3 < r2 < r1 | More topic actions...
Ideas, requests, problems regarding TWiki? Send feedback