Difference: MecrispCubeFlipper (1 vs. 20)
Revision 202023-12-31 - PeterSchmid
| Line: 1 to 1 | ||||||||
|---|---|---|---|---|---|---|---|---|
%DASHBOARD{ section="banner" | ||||||||
| Line: 12 to 12 | ||||||||
| The Flipper Zero | ||||||||
| Changed: | ||||||||
| < < | Sources on GitHub | |||||||
| > > | This page is no longer updated regularly, the current documentation can be found at
GitHub | |||||||
 | ||||||||
Revision 192023-12-14 - PeterSchmid
| Line: 1 to 1 | ||||||||
|---|---|---|---|---|---|---|---|---|
%DASHBOARD{ section="banner" | ||||||||
| Line: 8 to 8 | ||||||||
| }%
Intro
| ||||||||
| Deleted: | ||||||||
| < < | ||||||||
| Instant real-time programming with Forth. | ||||||||
| Added: | ||||||||
| > > | The Flipper Zero | |||||||
|
Sources on GitHub | ||||||||
| Deleted: | ||||||||
| < < |
| |||||||
|
Contents
| ||||||||
| Line: 89 to 87 | ||||||||
| ||||||||
| Added: | ||||||||
| > > |
| |||||||
Special Functions on Startup | ||||||||
Revision 182023-12-13 - PeterSchmid
| Line: 1 to 1 | ||||||||
|---|---|---|---|---|---|---|---|---|
%DASHBOARD{ section="banner" | ||||||||
| Line: 74 to 74 | ||||||||
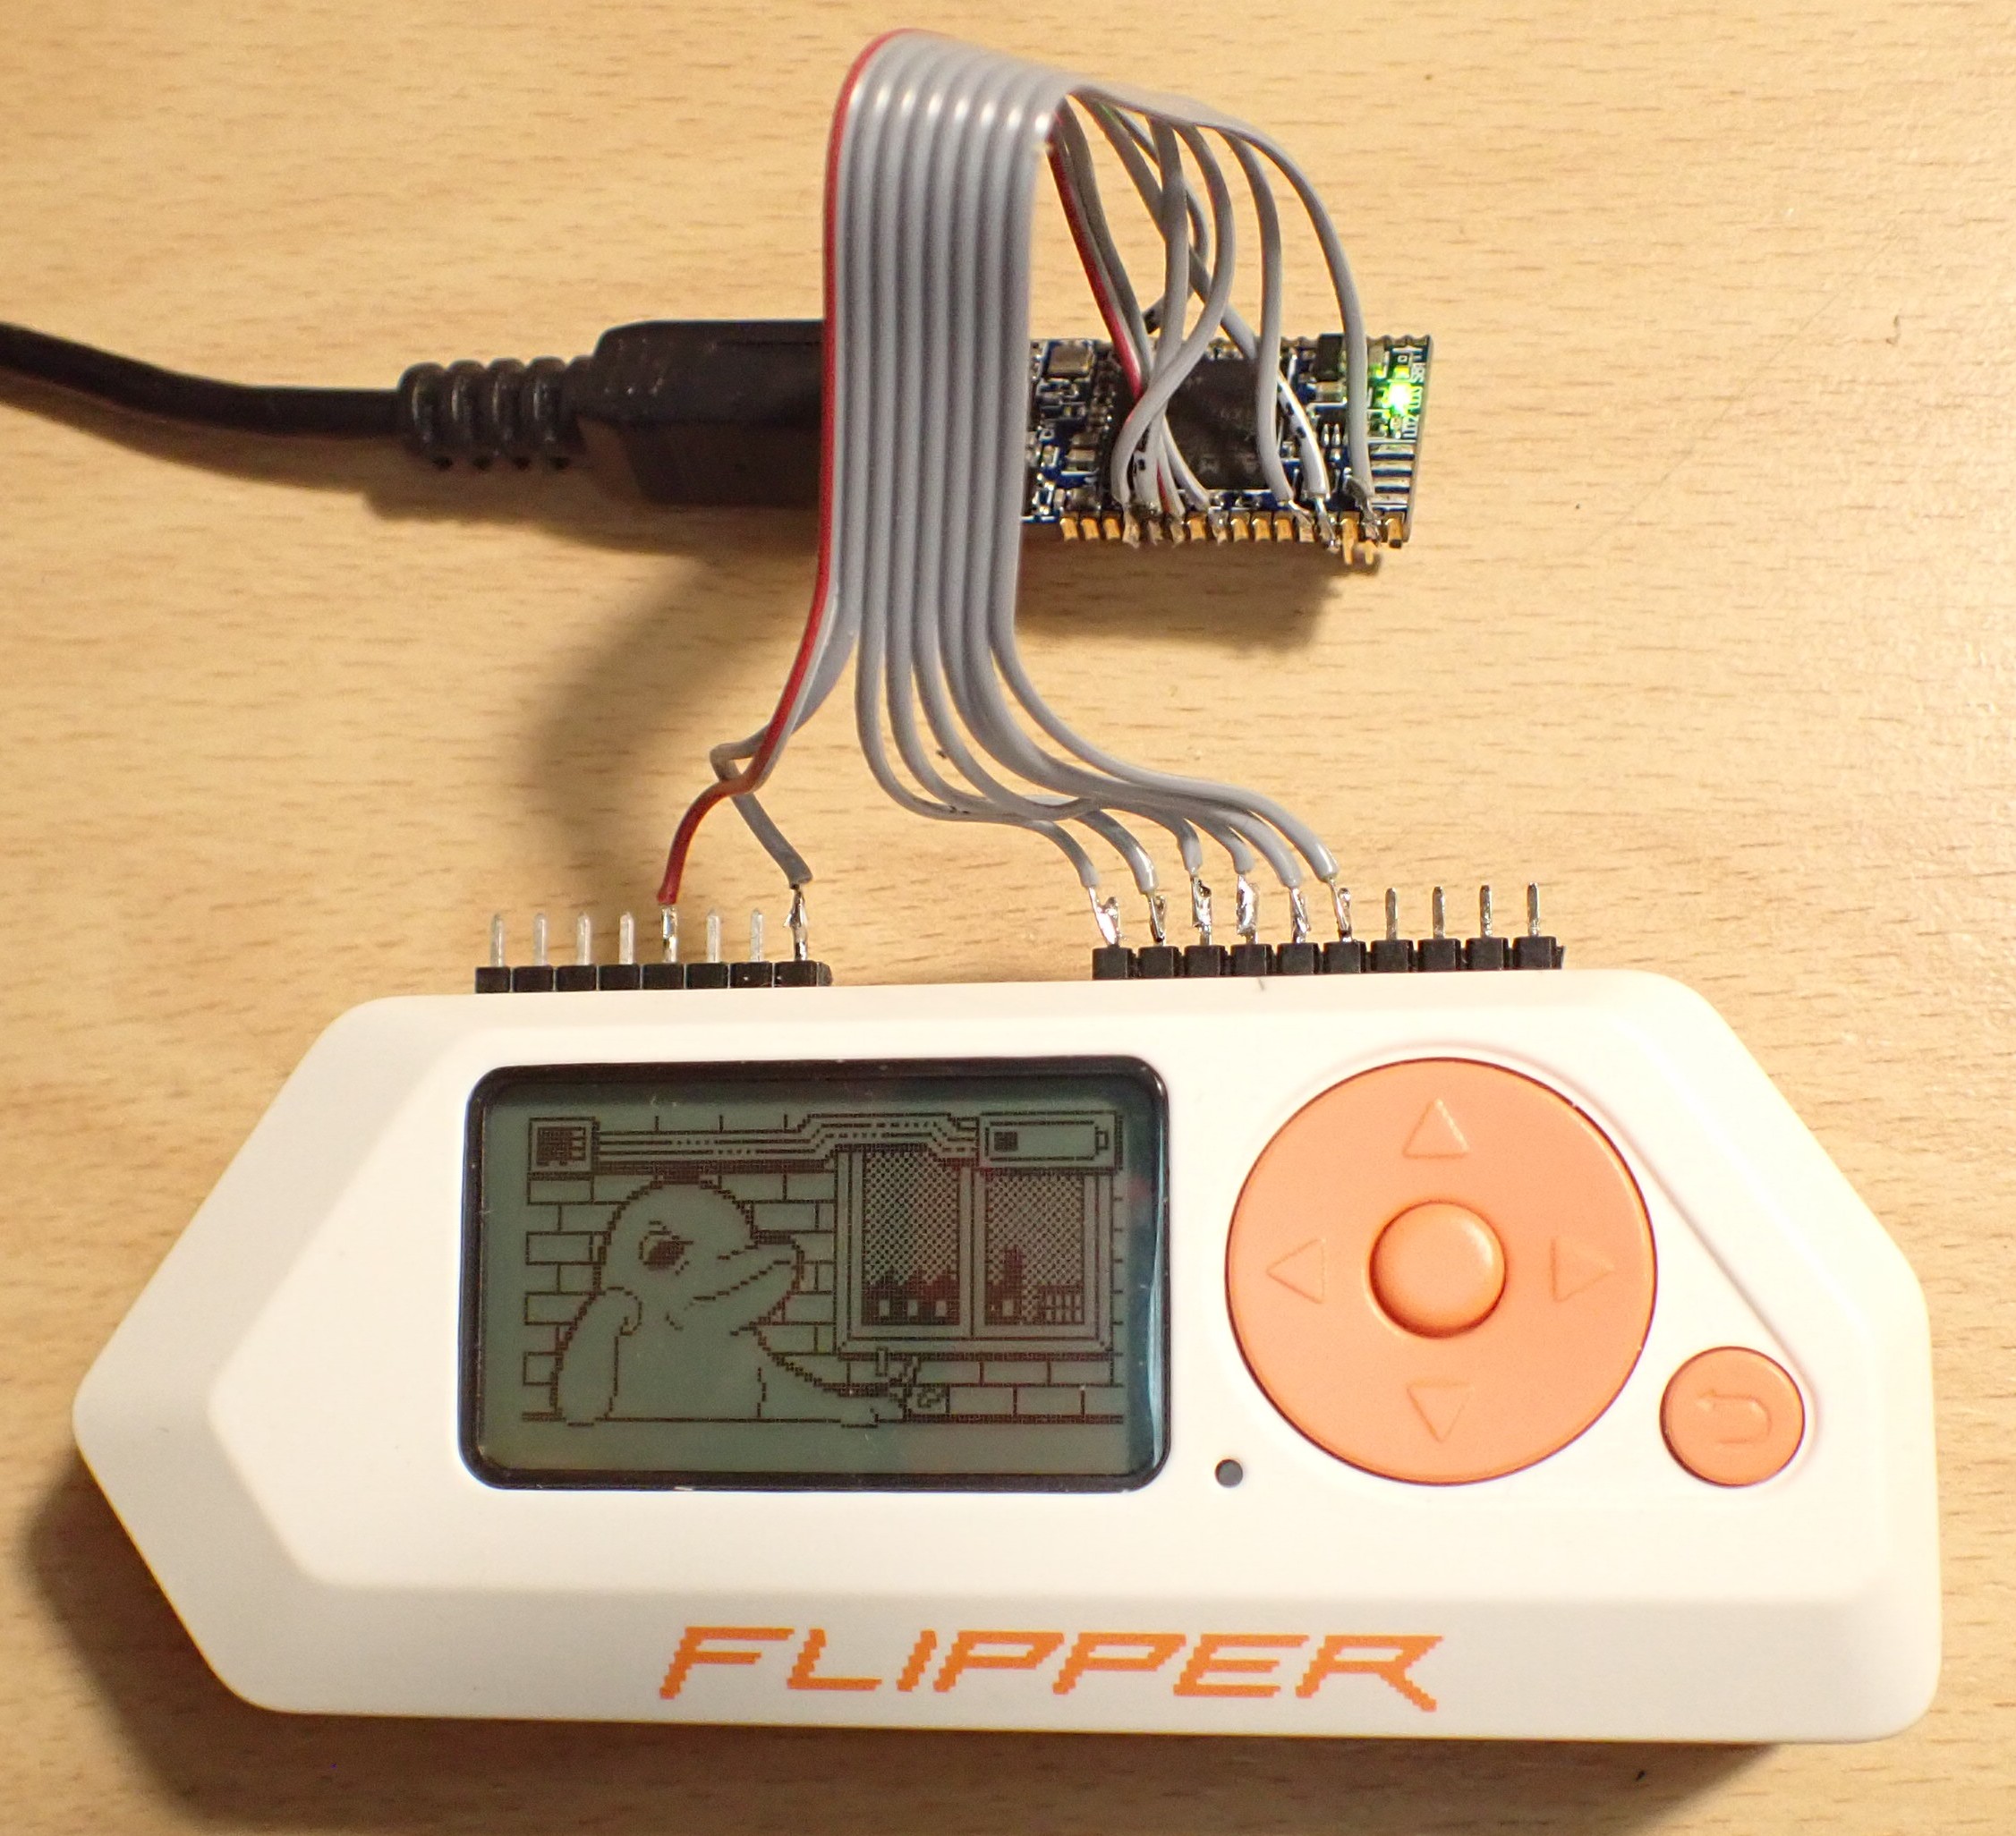
Flash the Mecrisp-Cube Firmware | ||||||||
| Changed: | ||||||||
| < < | Flash the Mecrisp-Cube binaryMecrispCubeFlipper.bin) or better the fs-util-binaryMecrispCubeFlipperFS.bin) to the Flipper Zero. Using the built-in USB DFU bootloader, see also firmware recovery | |||||||
| > > | Flash the Mecrisp-Cube binaryMecrispCubeFlipper.bin) or better the fs-util-binaryMecrispCubeFlipperFS.bin) to the Flipper Zero. Using the built-in USB DFU bootloader, see also firmware recovery | |||||||
| ||||||||
Revision 172023-12-13 - PeterSchmid
| Line: 1 to 1 | ||||||||
|---|---|---|---|---|---|---|---|---|
%DASHBOARD{ section="banner" | ||||||||
| Line: 69 to 69 | ||||||||
| ||||||||
| Added: | ||||||||
| > > |
| |||||||
Flash the Mecrisp-Cube Firmware | ||||||||
Revision 162023-12-12 - PeterSchmid
| Line: 1 to 1 | ||||||||
|---|---|---|---|---|---|---|---|---|
%DASHBOARD{ section="banner" | ||||||||
| Line: 160 to 160 | ||||||||
You can use the local CLI commands like mkfs, mkdir and cp to create a filesystem on the serial flash and fill it with files and folders. But this is tedious job because I haven't yet implemented a recursive copy for MecrispCube. But there is prepared disk image
(for details see MicroSdBlocks#Serial_Flash) on microSD and the tool dd. You can copy the disk image to the drive 0: (this takes about 8 Minutes):
| ||||||||
| Changed: | ||||||||
| < < | dd 1:/boot/fd-1MiB.img 0:[CR] | |||||||
| > > | dd 1:/boot/fd-384KiB.img 0:[CR] | |||||||
| ok. mount 0:[CR] ok. | ||||||||
Revision 152023-12-11 - PeterSchmid
| Line: 1 to 1 | ||||||||
|---|---|---|---|---|---|---|---|---|
%DASHBOARD{ section="banner" | ||||||||
| Line: 23 to 23 | ||||||||
Contents
| ||||||||
| Changed: | ||||||||
| < < | ||||||||
| > > | ||||||||
FeaturesThe standard Mecrisp-Cube features like RTOS, Filesystem, USB, etc. | ||||||||
| Line: 53 to 53 | ||||||||
| Changed: | ||||||||
| < < | ||||||||
| > > | ||||||||
Getting StartedThese instructions will get you a copy of the project up and running on your local | ||||||||
| Line: 215 to 215 | ||||||||
| Changed: | ||||||||
| < < | ||||||||
| > > | ||||||||
Installing Development Environment | ||||||||
Revision 142023-12-11 - PeterSchmid
| Line: 1 to 1 | ||||||||
|---|---|---|---|---|---|---|---|---|
%DASHBOARD{ section="banner" | ||||||||
| Line: 73 to 73 | ||||||||
Flash the Mecrisp-Cube Firmware | ||||||||
| Changed: | ||||||||
| < < | Flash the Mecrisp-Cube binaryMecrispCubeFlipper.bin) or the util-binaryMecrispCubeFlipperUtil.bin) to the Flipper Zero. Using the built-in USB DFU bootloader, see also firmware recovery | |||||||
| > > | Flash the Mecrisp-Cube binaryMecrispCubeFlipper.bin) or better the fs-util-binaryMecrispCubeFlipperFS.bin) to the Flipper Zero. Using the built-in USB DFU bootloader, see also firmware recovery | |||||||
| ||||||||
| Line: 98 to 98 | ||||||||
RGB LED as Status IndicatorThe RGB LED displays the status | ||||||||
| Changed: | ||||||||
| < < |
| |||||||
| > > |
| |||||||
| ||||||||
| Line: 142 to 143 | ||||||||
Additional Tools and Local Filesystem | ||||||||
| Changed: | ||||||||
| < < | Populate a microSD with the contents of sdcard | |||||||
| > > | Populate a microSD with the contents of sdcard | |||||||
|
The directory should look like this:
| ||||||||
| Line: 169 to 170 | ||||||||
| ok. | ||||||||
| Changed: | ||||||||
| < < | The Mecrisp have some tools bundled in its distribution e.g. assembler, disassembler, dump, float. I put those tools and some more into the folder /fsr. With the "init.fs script" I compile my favorite ones into the flash directory (if you use the util-binary | |||||||
| > > | The Mecrisp have some tools bundled in its distribution e.g. assembler, disassembler, dump, float. I put those tools and some more into the folder /fsr. With the "init.fs script" I compile my favorite ones into the flash directory (if you use the fs-util-binary | |||||||
compiletoflash[CR] ok. include /etc/init.fs[CR] | ||||||||
| Line: 229 to 230 | ||||||||
| Get the sources from github:
| ||||||||
| Changed: | ||||||||
| < < | psi@homer:~> git clone --branch WB5M https://github.com/spyren/Mecrisp-Cube | |||||||
| > > | psi@homer:~> git clone --branch Flipper https://github.com/spyren/Mecrisp-Cube | |||||||
| Klone nach 'Mecrisp-Cube' ... remote: Enumerating objects: 1157, done. remote: Counting objects: 100% (1157/1157), done. | ||||||||
| Line: 247 to 248 | ||||||||
| Browse to Mecrisp-Cube directory | ||||||||
| Changed: | ||||||||
| < < | Generate code from the STM32CubeMX MecrispCubeWB5M.ioc file: | |||||||
| > > | Generate code from the STM32CubeMX MecrispCubeFlipper.ioc file: | |||||||
Project -> Generate Code | ||||||||
Revision 132023-12-10 - PeterSchmid
| Line: 1 to 1 | ||||||||
|---|---|---|---|---|---|---|---|---|
%DASHBOARD{ section="banner" | ||||||||
| Line: 84 to 84 | ||||||||
| ||||||||
| Changed: | ||||||||
| < < | Switch On/Off | |||||||
| > > | Switch On/Off, Buttons, LED | |||||||
| ||||||||
| Added: | ||||||||
| > > | Special Functions on StartupUSB-CDC is the default console.
RGB LED as Status IndicatorThe RGB LED displays the status
| |||||||
Use the Terminal (USB CDC) | ||||||||
| Line: 127 to 140 | ||||||||
| hello[CR] World ok. | ||||||||
| Deleted: | ||||||||
| < < | Special Functions on StartupUSB-CDC is the default console.
RGB LED as Status IndicatorThe RGB LED displays the status
| |||||||
Additional Tools and Local FilesystemPopulate a microSD with the contents of sdcard | ||||||||
Revision 122023-12-10 - PeterSchmid
| Line: 1 to 1 | ||||||||
|---|---|---|---|---|---|---|---|---|
%DASHBOARD{ section="banner" | ||||||||
| Line: 84 to 84 | ||||||||
| ||||||||
| Added: | ||||||||
| > > | Switch On/Off
| |||||||
Use the Terminal (USB CDC)Connect the Flipper Zero USB to the PC. Start the terminal emulator application on the PC. | ||||||||
| Line: 121 to 129 | ||||||||
Special Functions on StartupUSB-CDC is the default console. | ||||||||
| Changed: | ||||||||
| < < | ||||||||
| > > | ||||||||
RGB LED as Status IndicatorThe RGB LED displays the status | ||||||||
Revision 112023-12-02 - PeterSchmid
| Line: 1 to 1 | ||||||||
|---|---|---|---|---|---|---|---|---|
%DASHBOARD{ section="banner" | ||||||||
| Line: 57 to 57 | ||||||||
Getting StartedThese instructions will get you a copy of the project up and running on your local | ||||||||
| Changed: | ||||||||
| < < | machine Flipper Zero for development and testing purposes. | |||||||
| > > | machine (Flipper Zero) for development and testing purposes. | |||||||
Prerequisites | ||||||||
| Changed: | ||||||||
| < < |
| |||||||
| > > |
| |||||||
| Line: 70 to 71 | ||||||||
| ||||||||
| Added: | ||||||||
| > > | Flash the Mecrisp-Cube Firmware | |||||||
Flash the Mecrisp-Cube binaryMecrispCubeFlipper.bin) or the util-binaryMecrispCubeFlipperUtil.bin) to the Flipper Zero. Using the built-in USB DFU bootloader, see also firmware recovery
| ||||||||
| Changed: | ||||||||
| < < |
| |||||||
| > > |
| |||||||
| Changed: | ||||||||
| < < | Start the terminal emulator application on the PC. | |||||||
| > > | Use the Terminal (USB CDC)Connect the Flipper Zero USB to the PC. Start the terminal emulator application on the PC. | |||||||
Check for the serial communication port (e.g. for Linux /dev/ttyACM0).
I set the putty terminal configuration to | ||||||||
| Line: 89 to 97 | ||||||||
| ||||||||
| Added: | ||||||||
| > > | You should see something like this in your terminal: | |||||||
| Changed: | ||||||||
| < < | reset Mecrisp-Stellaris RA 2.5.4 by Matthias Koch. | |||||||
| > > | Mecrisp-Stellaris RA 2.5.4 by Matthias Koch. | |||||||
| Mecrisp-Cube 1.5.0 for STM32WB Flipper, 63/128 KiB RAM/FLASH dictionary (C) 2023 peter@spyr.ch * Firmware Package STM32Cube FW_WB V1.17.3, USB-CDC, BLE Stack 5.3 (C) 2023 STMicroelectronics | ||||||||
| Line: 96 to 105 | ||||||||
| * Firmware Package STM32Cube FW_WB V1.17.3, USB-CDC, BLE Stack 5.3 (C) 2023 STMicroelectronics * CMSIS-RTOS V2 FreeRTOS wrapper, FreeRTOS Kernel V10.3.1 (C) 2020 Amazon.com * FatFs for internal flash and microSD - Generic FAT fs module R0.12c (C) 2017 ChaN | ||||||||
| Deleted: | ||||||||
| < < | ||||||||
| include 0:/etc/rc.local | ||||||||
| Added: | ||||||||
| > > |
Use the interpreter:
| |||||||
| 23 5 / .[CR] 4 ok. | ||||||||
| Added: | ||||||||
| > > |
Type in your first Forth program:
| |||||||
| : hello ." World" ;[CR] ok. hello[CR] World ok. | ||||||||
| Line: 178 to 194 | ||||||||
| 08040608: F847 str r6 [ r7 #-4 ]! | ||||||||
| Added: | ||||||||
| > > | Flash the original Flipper FirmwareIf you want to go back to the original firmware, do the following
| |||||||
|
| ||||||||
Revision 102023-12-02 - PeterSchmid
| Line: 1 to 1 | ||||||||
|---|---|---|---|---|---|---|---|---|
%DASHBOARD{ section="banner" | ||||||||
| Line: 57 to 57 | ||||||||
Getting StartedThese instructions will get you a copy of the project up and running on your local | ||||||||
| Changed: | ||||||||
| < < | machine Flipper Zero) for development and testing purposes. | |||||||
| > > | machine Flipper Zero for development and testing purposes. | |||||||
Prerequisites | ||||||||
| Line: 68 to 68 | ||||||||
| ||||||||
| Added: | ||||||||
| > > |
| |||||||
| Changed: | ||||||||
| < < | Flash the Mecrisp-Cube binaryMecrispCubeFlipper.bin) or the util-binaryMecrispCubeFlipperUtil.bin) to the Flipper Zero. | |||||||
| > > | Flash the Mecrisp-Cube binaryMecrispCubeFlipper.bin) or the util-binaryMecrispCubeFlipperUtil.bin) to the Flipper Zero. Using the built-in USB DFU bootloader, see also firmware recovery | |||||||
| Changed: | ||||||||
| < < |
| |||||||
| > > |
| |||||||
| ||||||||
| Changed: | ||||||||
| < < |
| |||||||
| > > | for Linux sudo /usr/local/STMicroelectronics/STM32Cube/STM32CubeProgrammer/bin/STM32CubeProgrammer
| |||||||
Start the terminal emulator application on the PC.
Check for the serial communication port (e.g. for Linux /dev/ttyACM0). | ||||||||
Revision 92023-12-02 - PeterSchmid
| Line: 1 to 1 | ||||||||
|---|---|---|---|---|---|---|---|---|
%DASHBOARD{ section="banner" | ||||||||
| Changed: | ||||||||
| < < | image="/twiki/pub/MecrispCube/BoardSupportPackageFlipper/flipper-header.jpg" | |||||||
| > > | image="/twiki/pub/MecrispCube/MecrispCubeFlipper/flipper-header.jpg" | |||||||
| title="Mecrisp-Cube for the Flipper Zero" titlestyle="color:#F00000;" }% | ||||||||
| Line: 61 to 61 | ||||||||
Prerequisites | ||||||||
| Changed: | ||||||||
| < < |
| |||||||
| > > |
| |||||||
| Line: 242 to 242 | ||||||||
 This work by Peter Schmid is licensed under a Creative Commons Attribution-ShareAlike 4.0 International License. Sitronix ST7567 \ No newline at end of file | ||||||||
| Added: | ||||||||
| > > |
| |||||||
Revision 82023-11-26 - PeterSchmid
| Line: 1 to 1 | ||||||||
|---|---|---|---|---|---|---|---|---|
%DASHBOARD{ section="banner" | ||||||||
| Line: 38 to 38 | ||||||||
| ||||||||
| Added: | ||||||||
| > > |
| |||||||
| ||||||||
| Line: 46 to 47 | ||||||||
| ||||||||
| Changed: | ||||||||
| < < |
| |||||||
| > > |
| |||||||
| For more BSP details see BoardSupportPackageFlipper. | ||||||||
Revision 72023-11-26 - PeterSchmid
| Line: 1 to 1 | ||||||||
|---|---|---|---|---|---|---|---|---|
%DASHBOARD{ section="banner" | ||||||||
| Line: 37 to 37 | ||||||||
| ||||||||
| Added: | ||||||||
| > > |
| |||||||
| ||||||||
| Deleted: | ||||||||
| < < |
| |||||||
| ||||||||
Revision 62023-11-25 - PeterSchmid
| Line: 1 to 1 | ||||||||
|---|---|---|---|---|---|---|---|---|
%DASHBOARD{ section="banner" | ||||||||
| Line: 35 to 35 | ||||||||
| ||||||||
| Added: | ||||||||
| > > |
| |||||||
| ||||||||
| Deleted: | ||||||||
| < < |
| |||||||
| ||||||||
| Deleted: | ||||||||
| < < |
| |||||||
| ||||||||
Revision 52023-11-19 - PeterSchmid
| Line: 1 to 1 | ||||||||
|---|---|---|---|---|---|---|---|---|
%DASHBOARD{ section="banner" | ||||||||
| Line: 35 to 35 | ||||||||
| ||||||||
| Added: | ||||||||
| > > |
| |||||||
Not supported yet:
| ||||||||
| Deleted: | ||||||||
| < < |
| |||||||
| ||||||||
Revision 42023-11-13 - PeterSchmid
| Line: 1 to 1 | ||||||||
|---|---|---|---|---|---|---|---|---|
%DASHBOARD{ section="banner" | ||||||||
| Line: 13 to 13 | ||||||||
|
Sources on GitHub | ||||||||
| Changed: | ||||||||
| < < | Error: Exception 420: no decode delegate for this image format `' @ error/constitute.c/ReadImage/575 | |||||||
| > > | | |||||||
| Changed: | ||||||||
| < < |
| |||||||
| > > |
| |||||||
| ||||||||
| Line: 69 to 69 | ||||||||
| ||||||||
| Changed: | ||||||||
| < < | Flash the Mecrisp-Cube binaryMecrispCubeFlipper.bin) or the util-binaryMecrispCubeFlipperUtil.bin) to the Discovery Board. | |||||||
| > > | Flash the Mecrisp-Cube binaryMecrispCubeFlipper.bin) or the util-binaryMecrispCubeFlipperUtil.bin) to the Flipper Zero. | |||||||
| ||||||||
| Line: 88 to 88 | ||||||||
| ||||||||
| Changed: | ||||||||
| < < | Mecrisp-Stellaris RA 2.5.4 by Matthias Koch. | |||||||
| > > | reset Mecrisp-Stellaris RA 2.5.4 by Matthias Koch. | |||||||
| Changed: | ||||||||
| < < | Mecrisp-Cube 1.5.0 for STM32WB Discovery, 63/384 KiB RAM/FLASH dictionary (C) 2022 peter@spyr.ch * Firmware Package STM32Cube FW_WB V1.14.1, USB-CDC, BLE Stack 5.3 (C) 2022 STMicroelectronics | |||||||
| > > | Mecrisp-Cube 1.5.0 for STM32WB Flipper, 63/128 KiB RAM/FLASH dictionary (C) 2023 peter@spyr.ch * Firmware Package STM32Cube FW_WB V1.17.3, USB-CDC, BLE Stack 5.3 (C) 2023 STMicroelectronics | |||||||
| * CMSIS-RTOS V2 FreeRTOS wrapper, FreeRTOS Kernel V10.3.1 (C) 2020 Amazon.com * FatFs for internal flash and microSD - Generic FAT fs module R0.12c (C) 2017 ChaN | ||||||||
| Deleted: | ||||||||
| < < | * tiny vi - part of BusyBox (C) 2000, 2001 Sterling Huxley | |||||||
| include 0:/etc/rc.local 23 5 / .[CR] 4 ok. | ||||||||
Revision 32023-11-11 - PeterSchmid
| Line: 1 to 1 | ||||||||
|---|---|---|---|---|---|---|---|---|
%DASHBOARD{ section="banner" | ||||||||
| Changed: | ||||||||
| < < | image="" | |||||||
| > > | image="/twiki/pub/MecrispCube/BoardSupportPackageFlipper/flipper-header.jpg" | |||||||
| title="Mecrisp-Cube for the Flipper Zero" titlestyle="color:#F00000;" }% | ||||||||
Revision 22023-10-21 - PeterSchmid
| Line: 1 to 1 | ||||||||
|---|---|---|---|---|---|---|---|---|
| ||||||||
| Changed: | ||||||||
| < < | Title | |||||||
| > > |
Mecrisp-Cube for the Flipper Zero
Intro
| |||||||
| Deleted: | ||||||||
| < < | Article text. | |||||||
| Changed: | ||||||||
| < < | Sitronix ST7567 | |||||||
| > > | Instant real-time programming with Forth.
Sources on GitHub
Contents
FeaturesThe standard Mecrisp-Cube features like RTOS, Filesystem, USB, etc.
Getting StartedThese instructions will get you a copy of the project up and running on your local machine Flipper Zero) for development and testing purposes.Prerequisites
MecrispCubeFlipper.bin) or the util-binaryMecrispCubeFlipperUtil.bin) to the Discovery Board.
/dev/ttyACM0).
I set the putty terminal configuration to
Mecrisp-Stellaris RA 2.5.4 by Matthias Koch.

Mecrisp-Cube 1.5.0 for STM32WB Discovery, 63/384  KiB RAM/FLASH dictionary (C) 2022 peter@spyr.ch
  * Firmware Package STM32Cube FW_WB V1.14.1, USB-CDC, BLE Stack 5.3 (C) 2022 STMicroelectronics
  * CMSIS-RTOS V2 FreeRTOS wrapper, FreeRTOS Kernel V10.3.1 (C) 2020 Amazon.com
  * FatFs for internal flash and microSD - Generic FAT fs module  R0.12c (C) 2017 ChaN
  * tiny vi - part of BusyBox (C) 2000, 2001 Sterling Huxley

include 0:/etc/rc.local
23 5 / .[CR] 4  ok.
: hello ." World" ;[CR]  ok.
hello[CR] World ok.
Special Functions on StartupUSB-CDC is the default console.
RGB LED as Status IndicatorThe RGB LED displays the status
Additional Tools and Local FilesystemPopulate a microSD with the contents of sdcardls -l 1:[CR] drw- 0 2021-04-18T18:12:38 boot drw- 0 2021-03-21T18:47:52 etc drw- 0 2021-03-21T18:47:54 fsr drw- 0 2021-03-21T18:47:54 home drw- 0 2021-03-21T18:47:56 man -rwa 7219 2021-01-08T19:42:36 README.md ok.You can use the local CLI commands like mkfs, mkdir and cp to create a filesystem on the serial flash and fill it with files and folders. But this is tedious job because I haven't yet implemented a recursive copy for MecrispCube. But there is prepared disk image
(for details see MicroSdBlocks#Serial_Flash) on microSD and the tool dd. You can copy the disk image to the drive 0: (this takes about 8 Minutes):
dd 1:/boot/fd-1MiB.img 0:[CR]
 ok.
mount 0:[CR]
 ok.
ls 0:[CR]
man                     fsr                     README.md               boot
etc                     home
 ok.
The Mecrisp have some tools bundled in its distribution e.g. assembler, disassembler, dump, float. I put those tools and some more into the folder /fsr. With the "init.fs script" I compile my favorite ones into the flash directory (if you use the util-binarycompiletoflash[CR] ok. include /etc/init.fs[CR] init.fs Loading started RAM Dictionary: 392991 KiB utils.fs loading ... conditional.fs loading ... dump.fs loading ... disassembler-m3.fs loading ... float.fs loading ... threads.fs loading ... RAM Dictionary: 392981 KiB init.fs finished ok.For example, the word disassember is available now:
see dump[CR]
080405F0: B500  push { lr }
080405F2: F7C2  bl  08002A3E  --> cr
080405F4: FA24
080405F6: CF08  ldmia r7 { r3 }
080405F8: F013  ands r2 r3 #F
080405FA: 020F
080405FC: F847  str r3 [ r7 #-4 ]!
080405FE: 3D04
08040600: 2A00  cmp r2 #0
08040602: D000  beq 08040606
08040604: 3610  adds r6 #10
08040606: CF08  ldmia r7 { r3 }
08040608: F847  str r6 [ r7 #-4 ]!
Installing Development EnvironmentA step by step series of examples that tell you how to get a development env running Install the IDE STM32CubeIDEpsi@homer:~> git clone --branch WB5M https://github.com/spyren/Mecrisp-Cube Klone nach 'Mecrisp-Cube' ... remote: Enumerating objects: 1157, done. remote: Counting objects: 100% (1157/1157), done. remote: Compressing objects: 100% (620/620), done. remote: Total 3183 (delta 720), reused 934 (delta 525), pack-reused 2026 Empfange Objekte: 100% (3183/3183), 41.60 MiB | 6.96 MiB/s, Fertig. Löse Unterschiede auf: 100% (2100/2100), Fertig.Import the project into the IDE: File -> Import -> General -> Existing Projects into Workspace -> Select root directory Copy project into workspace Browse to Mecrisp-Cube directoryGenerate code from the STM32CubeMX MecrispCubeWB5M.ioc file:
Project -> Generate CodeRestore changed source files
$ git status
{list of changed files}
$ git restore {files to restore}
Select the Build Configuration (Debug if you want to debug the project) and Build the project:
Project -> Build Configurations -> Set Active -> Debug/Release Project -> Build Project | |||||||
|
-- | ||||||||
| Changed: | ||||||||
| < < | Comments | |||||||
| > > | This work by Peter Schmid is licensed under a Creative Commons Attribution-ShareAlike 4.0 International License. | |||||||
| Changed: | ||||||||
| < < | ||||||||
| > > | Sitronix ST7567 | |||||||
Revision 12023-10-18 - PeterSchmid
| Line: 1 to 1 | ||||||||
|---|---|---|---|---|---|---|---|---|
| Added: | ||||||||
| > > |
TitleArticle text. Sitronix ST7567 --Comments | |||||||
View topic | History: r20 < r19 < r18 < r17 | More topic actions...
Ideas, requests, problems regarding TWiki? Send feedback